
Types of Plagiarism Infographic: What You Need to Know
We’re all responsible researchers, correct? We create perfect APA citations. Our MLA formatting is on point. Chicago style citation? We can do it with our eyes closed. We compose original essays. We’re all amazing writers. We’re...dreaming. You know the saying, if it sounds too good to be true, then it probably is.
Let’s face it, writing a research paper is tough. From start to finish, there are a lot of pieces to the puzzle. From note-taking, to finding credible sources, learning how to write an annotated bibliography, citing, formatting, it’s a lot! The pressure of putting together a high-quality paper is stressful and time-consuming, which is why some students feel the need to take shortcuts. Those shortcuts, which at the time may seem like clever hacks, can turn into pretty serious consequences. A disappointing grade, failed course, even expulsion, are just a few of the negative consequences that could happen by taking the easy way out.
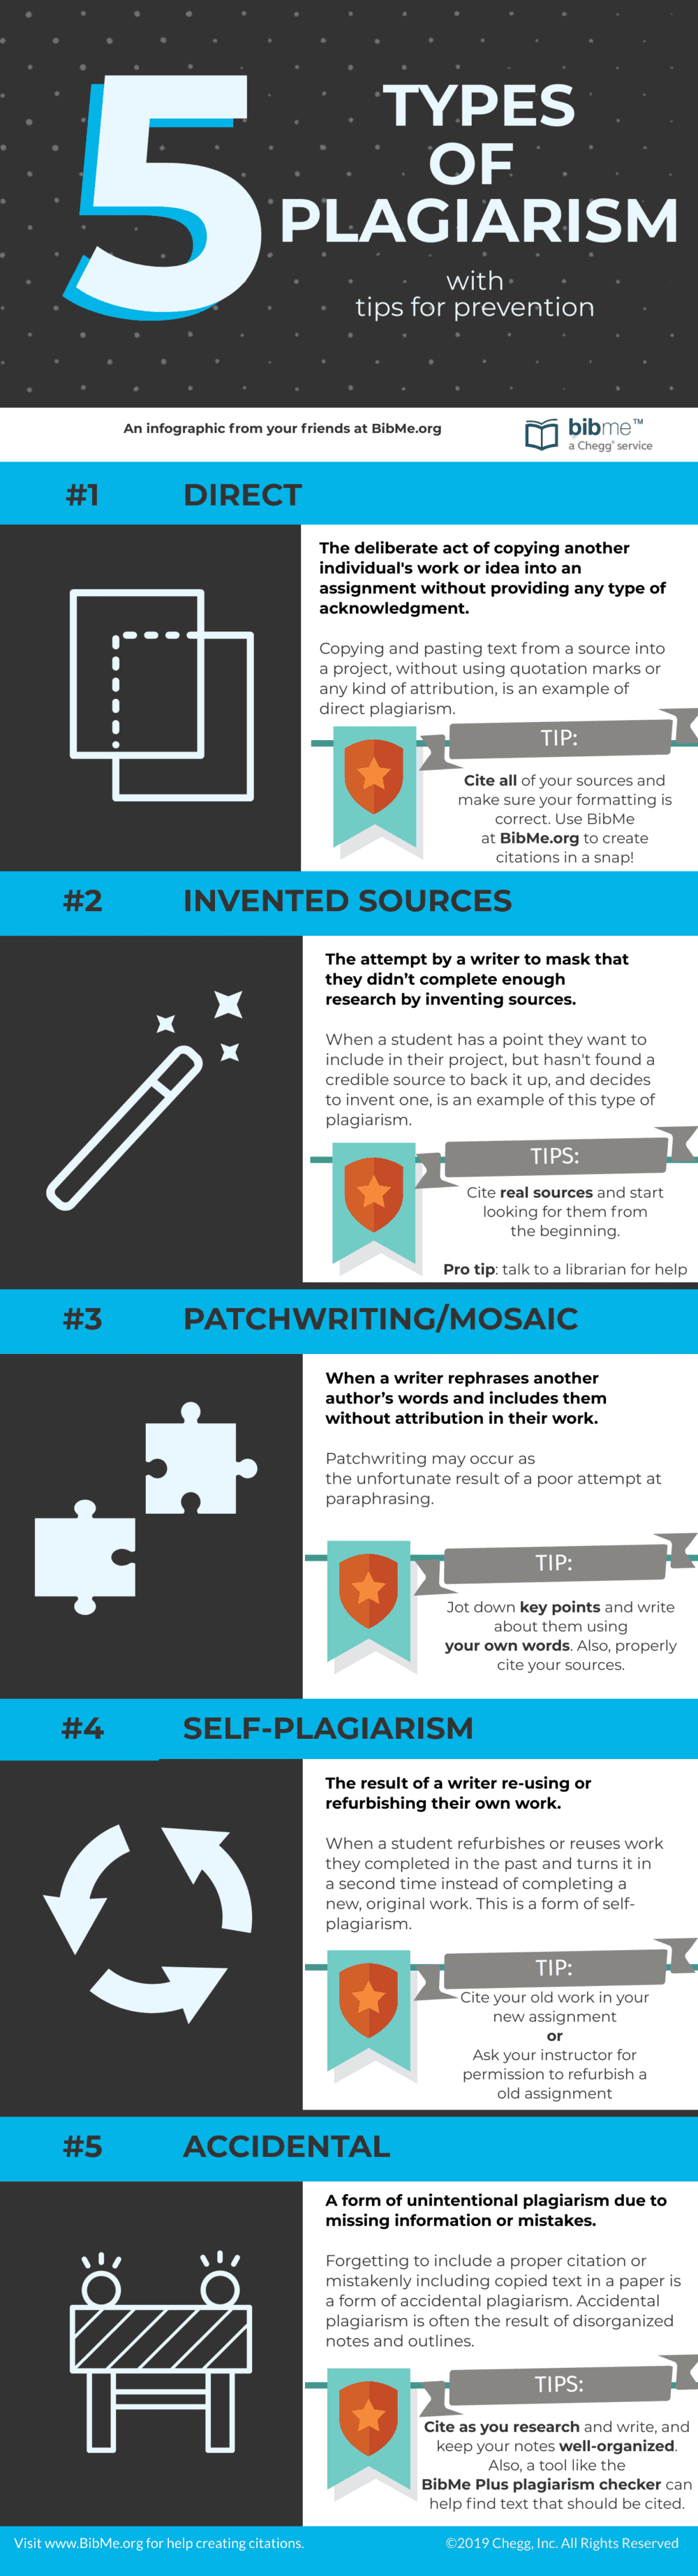
If it’s your goal to be a responsible researcher (and we sure hope it is!), then it’s important for you to be aware of the various types of plagiarism. Some forms of plagiarism are blatant and obvious. Some are so subtle that you may not even realize they’re forms of plagiarism. We’ve put together a colorful, explanatory infographic that highlights the 5 main types of plagiarism. We even take it a step further and explain how to prevent each type. Read through each form of plagiarism, learn how to prevent it, and feel secure and confident with submitting a paper that is plagiarism-free!
Looking for more resources? Take a peek at the BibMe grammar guides on topics like what’s a conjunction, reflexive vs intensive pronouns, varieties of nouns, and more! ...
A Better BibMe: Improved Plagiarism Checks, Easier Citing Process
Remember when BibMe.org was only about citations (APA reference, MLA citation, etc.)? Today, we’re still helping students crush the citing process, but we’ve also become a go-to tool for writing and plagiarism checking—and we’re not slowing down! After this summer and in the coming school year, BibMe tools are going to be better than ever! Read on to see what good developments are in store:
Faster plagiarism checks for your papers
Nobody likes waiting, especially if you’re under a time crunch and that paper you’re scanning is due in an hour. You can’t make time slow down, but we’ve sped up the BibMe Plus plagiarism checker: It’s now three times faster than before! Try it out and see for yourself.Wait, you check against how many sources?
It’s simple logic: The more sources your paper’s plagiarism checker can access, the lower your chance of being flagged for accidental plagiarism. Luckily for you, the BibMe plagiarism tool now checks your paper against billions of sources with technology similar to Turnitin! That’s right, not hundreds, thousands, or even millions—it’s billions.Coming to grammar checking: Easier navigation & Purdue OWL grammar knowledge
Two exciting changes are coming to the BibMe grammar checker. First, the grammar card experience is getting a big make-over! The new look will make it easier for you to navigate and review the great suggestions you receive. Second, knowledge and sentence examples from the well-known Purdue OWL will be added to our grammar suggestion cards. The extra information on each card will help you make informed decisions about your paper.Updated citation flow and feel for the fall
Sometime in the fall, the citing tool on BibMe.org is going to become a single-page app! That doesn’t sound immediately exciting, but this means that your citation workflow will be smoother and more efficient—and who doesn’t like that?Do you know what is a determiner? Could you give an adjective definition if asked? How is a personal pronoun used? Find out the answers to this and more by reading through the BibMe grammar guides. ...

4 Epiphanies All New Graduate Students Have
Your first semester of graduate school is even more exciting than your first semester of undergrad. You meet your professors and fellow students and start brainstorming ideas for awesome research projects. You get your shiny new laptop and student ID, and you start planning your daily routine: coffee run, running to morning classes, more coffee, running a lab, more coffee, studying in the library, more coffee. Then reality hits and everything you thought you knew changes. You’re totally out of touch and overwhelmed. Your desk becomes a sea of papers. And you have a few epiphanies:
Speaking of papers, did you know that the BibMe paper checker can scan your (or your students’) papers for grammar mistakes and accidental plagiarism? There are also resources that can help your students create APA citations and MLA citations.
Everything you knew about productivity is a lie
Sure, undergrad is hard, but it’s not oh-God-I-have-to-read-1000-pages-by-tomorrow-and-I-still-have-to-grade-papers hard. You realize that time is a construct, but sadly not one that you can bend to your needs. And your tried-and-true study methods don’t work because it takes you five times as long to read the same passage of assigned reading. However, you realize you can now become a master of time management, and you develop a talent born of necessity to juggle a million things at once. You’re adaptable and capable, skills that are coming in handy now.There’s actually a lot you don’t know
Aced all your undergrad classes? Graduated with honors? Yes, you learned a LOT and that’s what helped you get to grad school in the first place! However, now that you’re in graduate school, you’re regularly reminded that you know nothing. New lab procedures, conference-level presentation skills, knowing how to apply for funding, using advanced research skills and resources, writing to journal standards … there’s a lot to learn! However, it’s invigorating to try new things and get smarter! You try things out, accept constructive feedback on your work, and start to become a star graduate student.You are your own best resource
At the mixer, you made good friends who promised you that you’d totes do that research project together and that they’d share class notes with. Then, you all get caught in the storm that is grad school work and it gets harder to connect since you’re all struggling to stay afloat. However, you’ll learn to rely upon your own skills and smarts, and become a strong, self-sufficient individual.You’re pretty awesome
You’ve worked hard and studied harder, and you become a time-warping productivity master, able to juggle everything that grad school throws at you. Insults roll off your back, while you take constructive criticism and use it to make your work better. You realize your professor has become your mentor and that you can truly excel at academic work. Best of all, you feel good about yourself and ready to take on the world — after you catch a few minutes of sleep, finally. ...
TA 101: Survive and Thrive
You check your email, expecting more of the same: that particular type of academic spam that includes pleas to submit your work to some unheard-of journal, reminders from your online course, and Dropbox notifications. And then you see it, that most delightful of all subject lines: “Offer: Assistantship Funding.” Phew!
So, you’ve been accepted as a TA. Congratulations! You celebrate for a hot second when it dawns on you: you’re about to be thrown into a classroom with 100+ students who will be coming to you with endless questions; most of which were answered in the syllabus. They’ll be submitting dozens of papers that you’ll have to collect and grade. What if you actually don’t know enough about the subject to write a paper yourself, let alone assistant-teach the class? Eek!
Relax. You got this! You were selected for a reason and the fact you’re reading this article means you care enough to do some research. Here are a few handy TA tips to help you not only survive but thrive.
As a TA you’re going to be proofing papers - lots of papers! Get help from the BibMe plagiarism tool to check for unintentional plagiarism in your students’ papers.
Learn your students’ names
I know this seems impossible. There are hundreds of people in the class and half of them are named Ashley or Brian. But it will make your life easier if you know their names. You’ll be better able to track attendance and know who’s doing well and who needs help. Plus, it makes you look like you know what you’re doing when you greet them by name. It makes handing back graded papers easier, too.
If you’re like me and have a terrible memory, use these tried-and-true mnemonic tricks to learn their names:
- Do an icebreaker that will give you interesting facts about them. You’re more likely to remember a person’s name when you know something about them.
- Look for patterns. Perhaps Brendan, Brandon, and Brian sit next to each other in row three. Don’t let their similar names befuddle you; use it to your advantage by identifying row three as the “B” row.
Be super-organized
Spreadsheets are your friend! Try not to be scared of them. They’re super handy for tracking attendance, grades, due dates, and pretty much anything you can think of. There are a lot of online videos and resources to help if you’re new to using Excel and its more advanced features.
You should be the person whom both your fellow students and the instructor rely upon to know the answers. Make it a point to learn the syllabus, memorize due dates, and have everything at hand. As you know, we students have dozens of assignments and grades to keep track of. We have brain farts. Wouldn’t you want your TA to be able to immediately tell you when the essay is due or what they made on the last pop quiz?
Stick to the books
If you’re tasked with leading discussions or making study guides, rely as heavily upon the instructor’s chosen material as you can. In a typical week, you and your students will have to read hundreds of pages for classes; that leaves little room in our brains for any other new material. Even if you have an article that perfectly illustrates Concept X, if it’s not on the syllabus, leave it at home.
However, by all means, use creative, visual ways to communicate information. Leading a study group? Design an infographic that shows this week’s material using a free tool like Canva. Giving a guest lecture? Make a Prezi that breaks down the concepts.
Lead by example
You overslept, your cheap car broke down, you got held late in another class. It happens. But you simply can’t be late as a TA. Your fellow students will betray you: while it’s okay for them to be late (at least, to them), it’s never okay for you to be late, and they will call you out on it. Do everything you can to ensure that you can be on time for the class you TA. I once missed the bus, so I ran two miles to be at the class I was TAing on time. Anything is possible with adrenaline.
In addition to being timely, you should be attentive and professional. During class sessions, no checking your phone, no working on other projects, no multi-tasking, period. I know, it sucks. But as soon as you divert your attention from the lesson, everyone else follows. Don’t be that guy (or girl).
Do your own work first
Wait, what? you say. I’m being paid to TA, so I’ve got to prioritize that! Yes, you do, but your own coursework needs to be your top priority. That’s because there will always be more TA work, and it’s easy to fall into a pattern where you never stop working on TA duties while your own work suffers.
By the same token, stick to your office hours. That’s your time to answer questions, grade papers, and do everything you’re assigned to do. Yes, you’ll need to pull some extra hours to get it all done, but when possible, you should set clear boundaries with your students. Don’t answer their messages at 4 a.m. Don’t meet with them outside of office hours. Respect your time (it makes time management easier, too).
When things go sour, don’t wait to address it
I know you’re not like this, but some students are simply awful. They feel entitled to A’s and they’re abusive toward anyone who holds authority — especially TAs, because they think you’re a punching bag. And you’re not!
Get the instructor involved at the first sign of a problem student. Don’t be like me: I waited until the problem student cornered me and the other TA in my office and became physically aggressive to let the supervising professor know. By that time, our academic careers were on the line because the student, who hadn’t turned in a single assignment and still expected an A, had written to the dean asserting that we were treating her unfairly. Get your side of the story straight before it gets to that point. (For the record, it turned out fine for us.)
There you go: a handy 101 course in how to survive and thrive as a TA. In a nutshell: be organized, be proactive, be cool. Remember: you got this.
No matter the discipline you are supporting, BibMe.org has the right citation style for your works cited page. MLA citation format, APA referencing, and Chicago manual of style are covered in depth with plenty of examples, to help you and your students cite it right the first time.

Your First Draft in 8 Easy Steps
Writing the first draft of a big paper can be really stressful, but one of the easiest ways to tackle a huge project is to break it into small, manageable bits. Try these eight easy steps for a complete first draft minus all the struggle.
Step 1: Clear your mind
Open a new document and type everything you know about the paper topic. It does not matter how much you know, just get it down. Let’s say you want to write about American culture in Japan, but you don’t know much about it. Make each thought a new text line like this:
- American culture in Japan
- World War II
- Okinawa
- Japanese culture in the U.S.
- Food, music,
- languages
Step 2: Research
Use your favorite research tools to look up your most exciting lines. When you find information that you like, copy and paste a portion directly into your document. Include URL’s and page numbers because you’ll need them for your APA reference page, MLA works cited, or other bibliography type later.
Your draft should now look like this:
- American culture in Japan
- World War II
- Okinawa
- Japanese culture in the U.S.
- Food, music
- languages
- Jeans, bourbon, hamburgers https://www.smithsonianmag.com/travel/how-japan-copied-american-culture-and-made-it-better-180950189/
- The victor’s secret weapon https://www.heddels.com/2014/07/japan-love-mid-century-america-much/
- Japanization, Marie Kondo https://www.newyorker.com/culture/culture-desk/the-united-states-of-japan
Tip: Change the text color or font of your original ideas. This will help you remember which researched texts need to be cited.
Step 3: Theme building
A minimum of fifteen to twenty lines is necessary before you begin this next step. Take a look at your lines and see what themes you can find. A good way to start is to ask yourself: What, Where, When and How.
Example Japan/American Culture Themes:
History of the U.S. in Japan
Japanese culture in the U.S.
Examples of American culture in Japan
Japanese immigration to the U.S.
Step 4: Thesis statement
With your themes in mind, it is time to write your thesis statement. If you need help writing your thesis, check out this piece.
Example thesis statement:
From California rolls to closet organizing gurus, Japan and the U.S. have an ongoing cultural exchange that began with World War II.
Tip: Feel free to begin from step one with a thesis already in mind. But note, the benefit of building your thesis from researched themes is that you know you already have facts to support it which can save a lot of time.
Step 5: Organize
Place all research lines under the theme where it fits best. Like this:
History of the U.S. in Japan
- The victor’s secret weapon https://www.heddels.com/2014/07/japan-love-mid-century-america-much/
- World War II
Examples of American Culture in Japan
- Jeans, bourbon, hamburgers https://www.smithsonianmag.com/travel/how-japan-copied-american-culture-and-made-it-better-180950189/
Tip: Depending on how your mind works, you might find it easier to switch steps 4 and 5. For some themes are easier to recognize after related lines are grouped together.
The Graveyard
It hurts to delete a good idea. Instead, put it to rest in a graveyard section at the bottom of your draft. These ideas that don’t fit any of your themes might be helpful in another paper.
Step 6: Order your themes
Your themes are fully constructed with lines under each, but you still need to decide how your themes will be presented in your paper. One of the simplest ways to do this is to go from past to present like this:
History of the U.S. in Japan
Examples of American culture in Japan
Japanese immigration to the U.S. past and present
Japanese culture in the U.S.
Step 7: Lines in order
The single lines you have under each theme still need to be placed in order. You can do this however you like, but it is important to remember that some lines will make it easier for you to transition from one theme to the next.
Example of sorted text lines:
History of the U.S. in Japan
- World War II
- The victor’s secret weapon https://www.heddels.com/2014/07/japan-love-mid-century-america-much/
Examples of American Culture in Japan
- Jeans, bourbon, hamburgers https://www.smithsonianmag.com/travel/how-japan-copied-american-culture-and-made-it-better-180950189/
Japanese culture in the U.S.
- Japanization, Marie Kondo https://www.newyorker.com/culture/culture-desk/the-united-states-of-japan
Tip: Be sure to give yourself a break between each step. Your work will be more efficient and effective if you allow yourself some distance. Make it easy to jump back in by typing what you’d like to do next at the top of your paper just before taking a break.
Step 8: Write baby write!
With all the correct information in order, all you have to do is put everything into your own words. A pro tip is to start with the theme that is the easiest or most fun to write. This will help you find your groove and get you ready for the more challenging themes.
Looking for a plagiarism definition? Wondering how subject verb agreement works? Asking what is an interjection? The BibMe grammar guides have answers for you.
...
How Brain Mapping Can Help You Crush That Paper
You’re at your desk looking over your paper assignment. You have an inkling of what concepts and examples you want to mention, but you have no idea where to start. Maybe, you ponder, there’s a productive way to get this tangled web of thoughts out of my head?
As you’ve probably deduced, brain mapping is the answer! Whether you’re writing a paper about Shakespeare or trying to argue that bananas are better than apples (both have their “a-peel”), brain mapping can help you organize your thoughts and writing.
If you’re really stuck for research paper ideas, BibMe.org can help! Check out the free writing and grammar guides for inspiration. They cover everything from verbs and nouns to coordinating conjunctions and possessive pronouns — cover all the basics and make your writing shine!
But wait, what exactly is brain mapping?
Brain mapping is an easy writing technique you can use to get your thoughts in order before you write. Ever read a “Choose Your Own Adventure” book where you pick what happens to your character? You start at the very beginning of the story, and as the journey progresses, you can go off in different directions. If you were to lay out all your adventure options, you’d get something that looks like a brain map!
The goal of a brain map is to get all your ideas onto paper and then draw connections among those ideas. Once you can see all your thoughts, you can then get a sense of which ideas are worth writing.
Ok, so why should I do it?
Brain mapping is the perfect step to take when you’re either confused about a topic or have too many thoughts about it (honestly, it’s perfect any time you have to write).
If you’re confused, it’s helpful to use a brain map to decipher why you’re confused. Write out the questions you have about the topic. From there, you can potentially start to answer them with some of the concepts you’ve learned in class. By laying out all the things you’ve learned in class, you can start to see how ideas connect.
This also works when you have too many thoughts. Maybe you’re overwhelmed by the amount of information given in class, and you’re unsure what to use. By seeing all your ideas at once, you give yourself the gift of seeing all the possibilities for your paper and honing in on the most relevant ones.
Great, I’m on board: how do I brain map?
The easiest way to start brain mapping is to grab a pen and paper. Write your prompt in the middle of your paper and circle it. From there, write down any immediate ideas that come to mind, and then connect them back to the prompt by drawing a line between each idea and the prompt. From there, look at each idea individually. Do additional thoughts, examples, or arguments come to mind? Connect them to the original idea. As you do this, you’ll create a map that fills your entire paper. At the end, see if you can draw additional connections between sub-ideas.
Once you have your map, you can see if a general flow arises. From there, you can then create an outline for your paper, and then write said paper!
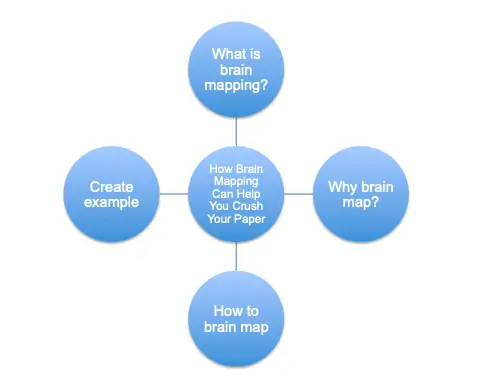
What’s an example of a brain map?
Here’s an example of a brain map using this very article! It’s very simple, but it gives you an idea of how you can visually organize the thoughts in your brain!
Your research is done, and your ideas are mapped with solid connections — now what? Use the BibMe plagiarism checker to help prevent unintentional plagiarism and cite your sources! BibMe citing tools include an APA reference generator, an MLA citation guide, a Chicago style citation maker, and other resources